Making the first letter decorative, large and capital in a text using LaTeX

In many of the old books we have the first letter as a large decorative capital. Many times very ornamental typefaces are used. Some examples

Petri Apiani Cosmographia, 1539

Johannes Hevelius Selenographia 1647

Johannes Hevelius  Machina celestis

1882

A Letter from Hevelius on observations of a comet, 1683

Sphaera c. 1230 by Sacro Bosco (Ed. published by Peter Apianus, 1526)

FROM GALILEO TO NUCLEAR AGE LEMON 1949

example of drop caps from old books

VISUAL ILLUSIONS LUCKIESH 1922

Another style that is often employed with the large capital letter is that the rest of the word, or the sentence is in small caps. Now small caps are distinct than the regular caps. They are capitals, but with the x-height of small letters. And small caps usually have slightly larger spacing between the words than the regular one.

RELATIVITY AND ITS ROOTS HOFFMAN 1983

The Night Thoughts of a Classical Physicist McCormmach 1982

The Pleasure of Text Barthes 1975

Now, even in some of the modern books the same effect is used. So if you are looking for a way to achieve this effect using LaTex, then lettrine is the package you are looking for.

Drop caps

The name of this effect is drop caps. When I was searching for finding a solution for achieving this effect, the first block was that I didn’t know what it was called! After a bit of searching here and there I finally came to know about the name: drop caps. So if you are stuck as I was about what this large capital letter style is called, thence the descriptive and verbose title of post.
Now back to LaTeX implementation. lettering gives you several options for customising the drop caps. For the simplest case, we can use the default font of the document
\usepackage{lettrine}
 
\lettrine{W}{hile} overall the work is well informed, I did not like the (almost) condescending tone she uses when discussing anything “free”. 
\lettrine[lines=2,lhang=.1,loversize=0.1]{W}{hile} overall the work is well informed, I did not like the (almost) condescending tone she uses when discussing anything “free”. 
\lettrine{A}{nother} example is needed.
\lettrine[lines=1,lhang=1,loversize=0.5]{W}{hile} overall the work is well informed, I did not like the (almost) condescending tone she uses when discussing anything “free”. 
  \lettrine[lines=3,lhang=0.75,loversize=0.25]{F}{or} example, she (almost) claims only commercial fonts are well designed because
These examples produce the following output
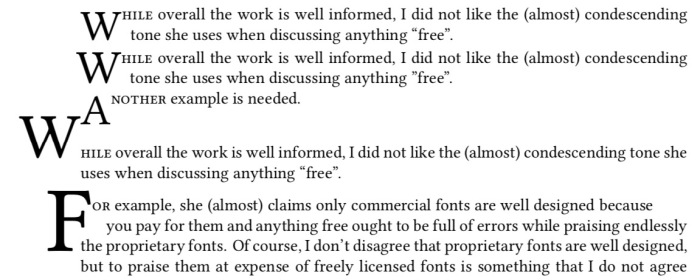
 

Now we can also use fancy header fonts. Have a look at some of them here.

\newfontfamily\zallman[Scale=4]{ZallmanCaps}
\renewcommand*{\LettrineFont}{\zallman}


\newfontfamily\acorn[Scale=4.2]{AcornInitials}
\renewcommand*{\LettrineFont}{\acorn}

You will need to play with the parameters for different fonts to find a better fit for your document.
Now how to add colour?
\lettrine[lines=3]{\color{red}S}{tart} 
\vspace{30pt}
\lettrine{\color{green}W}{hile} overall the work is well informed, I did not like the (almost) condescending tone she uses when discussing anything “free”. 
\lettrine[lines=2,lhang=.1,loversize=0.1]{\color{blue}W}{hile} overall the work is well informed, I did not like the (almost) condescending tone she uses when discussing anything “free”.

Happy typesetting!

Color and underline text in LaTeX

For a particular project, I had a requirement that the text be coloured as well as underlined. Now making text underlined in LaTeX has a default support in the form of \underline{text}, which simply produces an underlined text.

But what if you want to customise the underlining, for example, change the thickness of the underline, or its distance from the text baseline. Or simply you might want to have a different colour for the underline. There are several packages which allow you to customise this exact requirement.

For the present post I will choose the soul package which has some other goodies for typesetting as well. You can load the package with \usepackage{soul} Along with underlining, you have have strikeout and highlight. To setup the underline, soul package gives three options, underline depth, underline thickness and underline colour (page 12-13 of the package documentation).

You can set this in the preamble

\setul{⟨underline depth⟩}{⟨underline thickness⟩}

It is recommended that the units of these lengths are in ex, so that they are relative to the font size. For example,

\setul{0.3ex}{0.1ex}

To use it in the document \ul{underlined text} will produce

Another option is to set the colour of the underline. This can be done with

\setulcolor{gray}

With this option, the above code will look like

The color option can be changed anywhere in the document, so you can have change of colours as required. Defining in the preamble has a universal effect.

So far so good. Now in this case I wanted the underlined text to be of different colour. For this one can define a newcommand with text colour option.

\newcommand{\ublue}[1]{{\color{SteelBlue}\ul{#1}}}

I am also using the svgnames option from the xcolor package for calling colours by names.

\usepackage[svgnames]{xcolor}

In the main text, you can use it as \ublue{coloured and underlined text} to produce the required result. Will produce 


Good Example of a Bad Slide

good-example-of-a-bad-slide
(If you are not able to read the content, rest be assured, it is not due to the photo quality, thanks to Harshit for the photo)
The title says it all, do not dump so much text on a slide that it becomes unreadable to the readers. If the purpose of the slide is to show enabling text to the readers (and supporting/cueing text to the presenter) then this goal is lost in most of the presentations that you will see. People tend to cram as much text as possible on a given slide,
“I have only 15 slides!”
But the person doesn’t mention that 8 of those slides have texts which are not readable with 10 bullet points. A particular feature in slide creating softwares (both Free and proprietary) further aids in this by automatically reducing the text size if it exceeds its standard text box. LaTeX based Beamer will just make your text go below the slide, warning you that this might not be readable, use another slide.
Be responsible, keep less text on each slide, make more slides instead.

The True Purpose Of Graphic Display – J. W. Tukey

John Wilder Tukey, one of the greatest Statistician of the last century points to what the purpose of a graphic display should be:

  1.  Graphics are for the qualitative/descriptive – conceivably the semi quantitative – never for the carefully quantitative (tables do that better).
  2. Graphics are for comparison – comparison of one kind or another – not for access to individual amounts.
  3. Graphics are for impact – interocular impact if possible, swinging-finger impact if that is the best one can do, or impact for the unexpected as a minimum – but almost never for something that has to be worked at hard to be perceived.
  4. Finally, graphics should report the results of careful data analysis – rather than be an attempt to replace it. (Exploration-to guide data analysis – can make essential interim use of graphics, but unless we are describing the exploration process rather than its results, the final graphic should build on the data analysis rather than the reverse.)

From:

Tukey, J. W. (1993). Graphic comparisons of several linked aspects: Alternatives and suggested principles. Journal of Computational and Graphical Statistics, 2(1), 1-33.

Designing computer interface

Computers and related devices have to be designed with an understanding that
people with specific tasks in mind will want to use them in a way that is seamless with respect to their everyday work. To do this, those who design these systems need to know how to think in terms of the eventual users’ tasks and how to translate that knowledge into an executable system. But there is a problem with trying to teach the notion of designing computers for people. All designers are people and, most probably, they are users as well. Isn’t it therefore intuitive to design for the user? Why does it need to be taught when we all know what a good interface looks like?

Human Computer Interface

On Design

Design is both the disruptor and being disrupted. It’s disrupting markets, organizations, and relationships, and forcing us to rethink how we live. The discipline of design is also experiencing tremendous growth and change, largely influenced by economic and technology factors. No longer an afterthought, design is now an essential part of a product, and it may even be the most important part of a product’s value.
Source: Experience design is shaping our future – O’Reilly Radar

Latex Tufte class in org-mode

Edward Tufte is known for graphical excellence in his famous books. Some enthusiasts combined his design principles into LaTeX and you have the tufte-book and tufte-handout classes for excellence in typesetting. This has support for sidenotes, margin figures, full width figures etc.
Now, since I have shifted to org-mode on Emacs for most of my writing work including that of LaTeX, it was but natural to take this in org-mode output.
For this a small addition to your .emacs file and you are done. Of course after installing the dependencies. I also came to know about another nice package nicefrac for using in the documents.
For Fedora #yum install texlive-tufte-latex should do the job. Also some font problems may arise which can be solved by running updmap and enabling the needed font.

 ;; tufte-book class for writing classy books
(require 'org-latex)
(add-to-list 'org-export-latex-classes
'("tuftebook"
"\\documentclass{tufte-book}\n
\\usepackage{color}
\\usepackage{amssymb}
\\usepackage{gensymb}
\\usepackage{nicefrac}
\\usepackage{units}"
("\\section{%s}" . "\\section*{%s}")
("\\subsection{%s}" . "\\subsection*{%s}")
("\\paragraph{%s}" . "\\paragraph*{%s}")
("\\subparagraph{%s}" . "\\subparagraph*{%s}")))
 ;; tufte-handout class for writing classy handouts and papers
(require 'org-latex)
(add-to-list 'org-export-latex-classes
'("tuftehandout"
"\\documentclass{tufte-handout}
\\usepackage{color}
\\usepackage{amssymb}
\\usepackage{amsmath}
\\usepackage{gensymb}
\\usepackage{nicefrac}
\\usepackage{units}"
("\\section{%s}" . "\\section*{%s}")
("\\subsection{%s}" . "\\subsection*{%s}")
("\\paragraph{%s}" . "\\paragraph*{%s}")
("\\subparagraph{%s}" . "\\subparagraph*{%s}")))

Once you have added these to .emacs, in the org-mode you have to define #LaTeX_CLASS: tuftehandout or #LaTeX_CLASS: tuftebook to invoke this style in the tex output.
Enjoy the Tuftesque typesetting in your own work! Some snippets from my work in progress, no figures so far.
tufte-latex-book

Title Page

tufte-latex-book-2Table of contents

tufte-latex-book-3Main text